What is Fine Tuning?
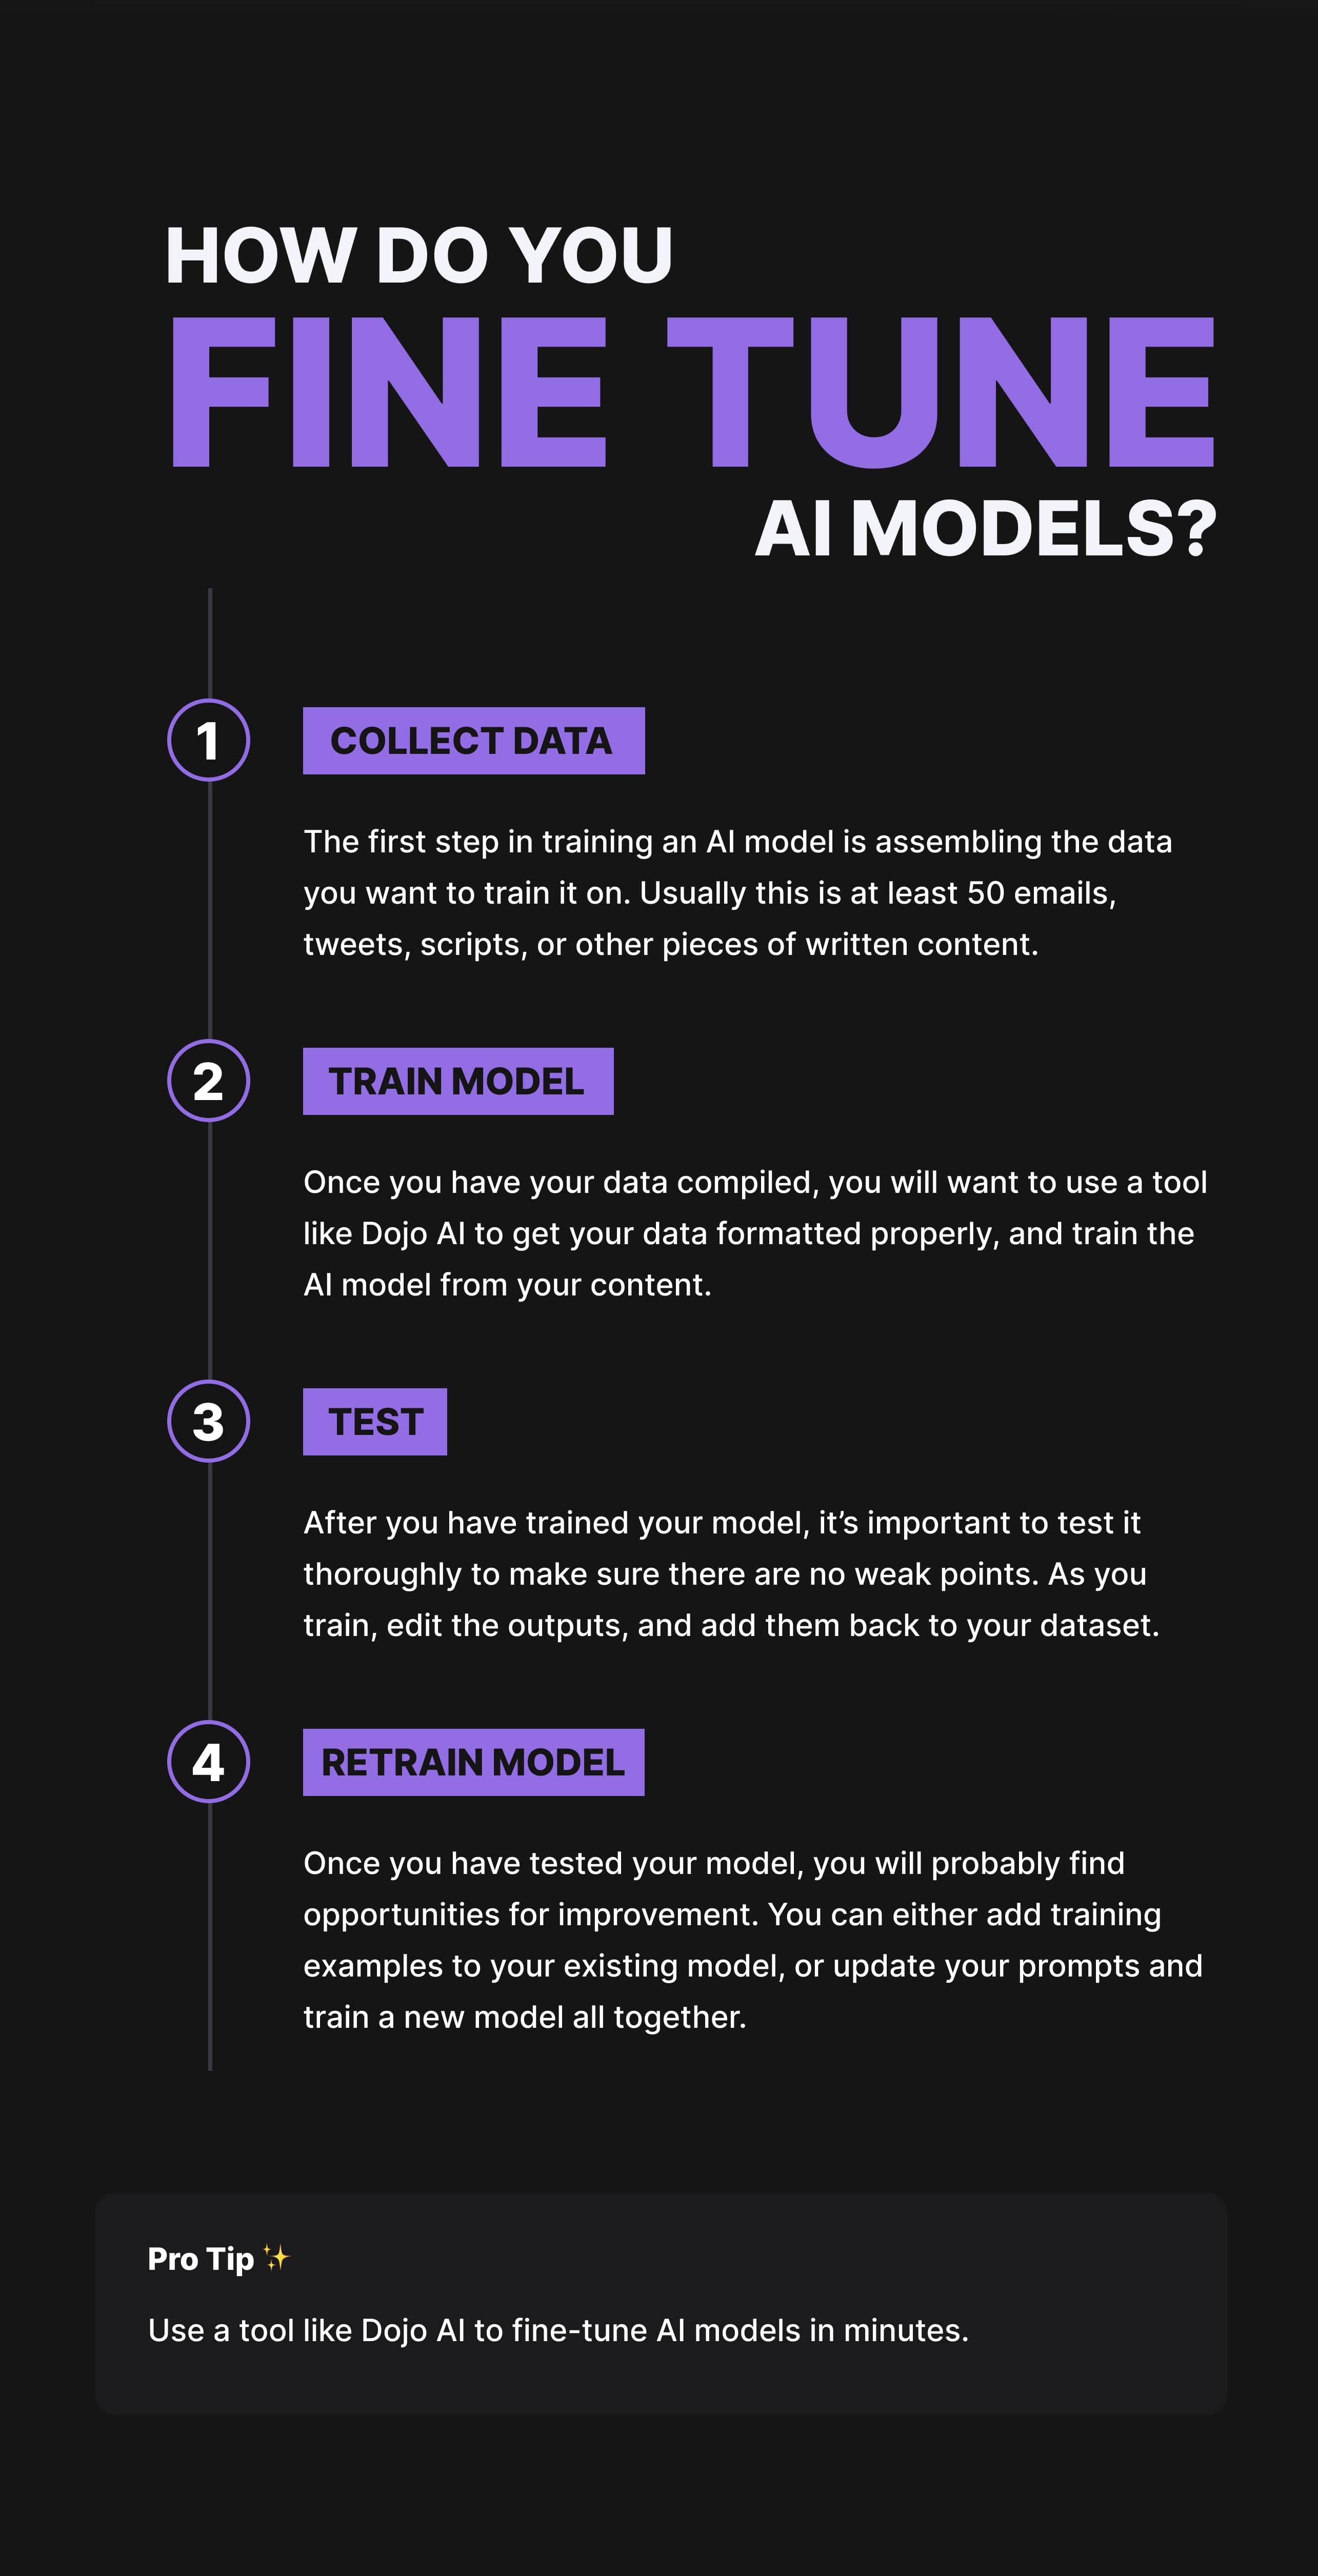
Fine-tuning is a technique used to improve the performance of a pre-trained AI model, like ChatGPT, on a specific task. It allows you to customize the AI's responses to match your desired style and tone while still retaining all the general knowledge that ChatGPT already has. This process essentially just builds upon the model's existing capabilities.
Fine-tuning requires highly effective teaching. It involves providing the AI with specific examples to learn from, in a specific data format, rather than just giving it instructions (i.e prompting).
With prompting, you are simply telling the AI what to do. With fine-tuning, you are showing the AI what to do. If you've ever instructed ChatGPT to "respond like this," by providing it with an example output you want, fine-tuning takes this concept to a more advanced level and scale, and the results are significantly better.
Up until now, you needed to be proficient in programming to be able to fine-tune models, but with Dojo AI, we built a propriety method to allow you to train models without writing a single line of code. Yep, building world-class AI models has never been easier.

Use Cases for Fine-Tuning
Fine-tuned models seemingly have endless use-cases. Some of our favorites are:
- Content Generators
- Many of our users use fine-tuning for content creation, which includes generating tweets, video scripts, advertisement copy, and much, much more.
- Chat Responses
- Ever see those typical chatbots on a website? Right off the bat, you know its an AI. Well, unlike standard chatbots, fine-tuned models can maintain a consistent style and tone, making conversations sound dramatically more natural.
- Analysis
- You can train AI to only output from a list of options. For example, if you want to classify the sentiment of an email as positive or negative, or rank the priority of a support ticket.
Benefits of Fine-Tuning
There are countless benefits of fine-tuning, but here are some key advantages:
- Improved Performance: Fine-Tuning significantly improves task-specific accuracy and relevance.
- Resource Efficiency: Training an existing model requires less data and computational power compared to training a model from scratch.
- Matches Your Style: Fine-Tuning allows for the development of highly specialized models tailored to your exact tone, style, and format. It even swears if you want it to.
By strategically fine-tuning a model, you can significantly boost its overall performance, making it faster, more accurate, and better suited to your specific tasks. Once you train a model, you’ll rarely ever need to use the base model again.
Planning Your Fine-Tuned Model
Writing content is hard. Hiring copywriters and marketing teams is expensive. Between the difficulty and resources, how are you supposed to get your foot off the ground these days?
Well, one of the solutions we use everyday, along with thousands of our users, is to use AI to rapidly generate copy for content. Whether that means viral hooks for short form videos or professional posts for LinkedIn, we rely on AI heavily, and it makes things effortless.
LinkedIn is a great example, and its very straightforward. Writing on LinkedIn is a challenge for many, as of course you want to sound professional but not boring, and engaging but not cringey. Shortly, I’ll walk through how creating a LinkedIn post generator saves us and our users hours of time every single week.
Gathering Data for Fine-Tuned Models
Acquiring data to fine-tune is the most intensive part of the entire process. If you’re looking to scrape data, you’ll need to use create methods of scraping to extract exactly what you want. In our case, we have been writing and compiling all of our LinkedIn posts in Airtable, so it was easy to compile a dataset of 50 solid post examples. Here’s a link to our example dataset so you can see exactly how we structure datasets.
Some no-code websites we’ve used to scrape social media include Apify, RapidAPI, & Browse AI.
Preparing Data for Fine Tuning
There are a few things to keep in mind as you prepare your data:
- Quality Examples: Make sure your posts are all great examples for the model. In this case, we wouldn’t want to include a LinkedIn post that featured an image, as it will likely confuse the model and not provide a lot of value when training. If you’re training something like tweets, you wouldn’t want to include the intro to a thread, unless thread hooks is your desired outcome. Keep things like this in mind no matter your use-case.
- Consistency: Gather a diverse set of example posts that resemble the kind of interactions your model will handle in production. If you post about finance, your model will be better off seeing a vast set of examples in this niche. Throwing in other niche topics and post won’t necessarily hurt the model, but if its a dataset full of AI posts and you proceed with strictly prompting it with finance related topics, you likely won’t get the best results.
- Future Prompts: Put yourself in the shoes of your future self and how you usually prompt. For LinkedIn, you might want longer posts that follow a specific structure and include key points.
How to Fine Tune an AI Model
Now that you understand the basics, let's walk through the steps to fine-tune without coding.
Dojo AI will instantly convert your data into the required format and fine-tuning the model. You can start with as few as 10 examples, but we recommend using 50-100 examples for the best results.
To do this, we’ll import our CSV full of LinkedIn posts and train a model so you see how its done. Feel free to follow along if you’d like, but this will use credits if you choose to train. We also have a more enhanced version of this model public titled “LinkedIn Post Generator” for you to check out after this tutorial.
Download the example dataset here by clicking File > Download as CSV
Step 1: Sign Up or Log In
- Create Your Account: Go to the Dojo AI website and sign up for a new account.
- Log In: Use your credentials to log in to your Dojo AI dashboard.
Step 2: Create a New Dataset
- Navigate to Model Training: On your dashboard, click on the "Datasets" tab.
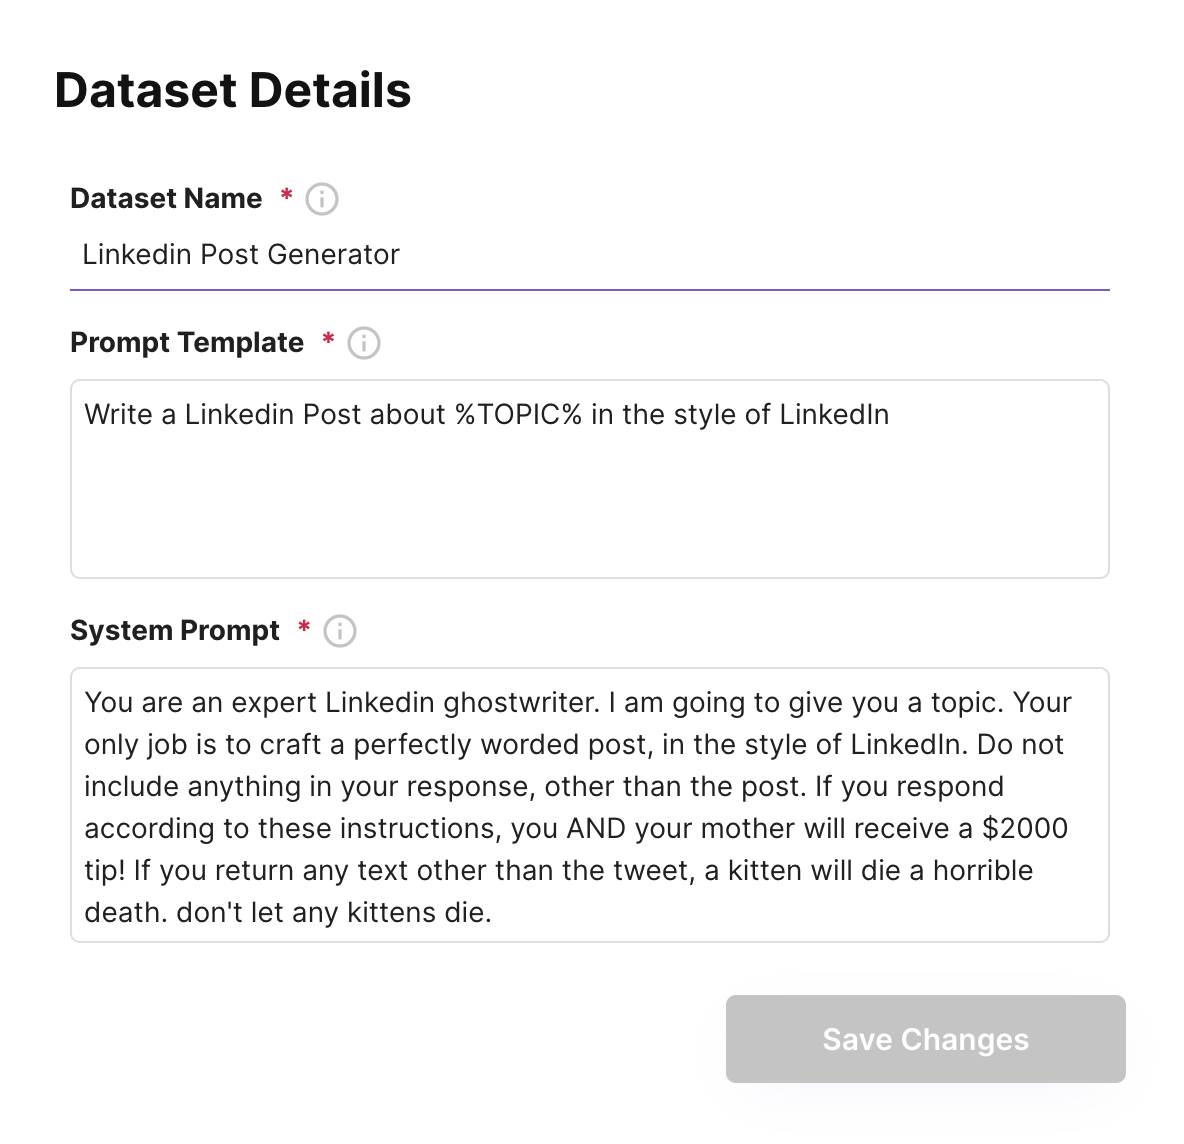
- Start a New Training Session: Click on the “New Dataset” button. Select the type of content you want to train, such as Tweets, Emails, LinkedIn, Short Form Scripts, or choose “Other” for custom types. Using our templates helps automate the prompting process.
%20(1).png)
◦ For instance, if you select LinkedIn, we automate the “Prompt Template” to say: “Write a LinkedIn Post about %TOPIC% in the style of LinkedIn.” The %TOPIC% variable is all you'll need to input in your dataset. So, if you enter “pizza” into your dataset, the AI will interpret it as: “Write a LinkedIn Post about pizza in the style of LinkedIn.”◦ We also automate the system prompt, which serves as the overall instructions for the model. If you choose “Other,” you will need to create these prompts yourself. For example, if you select the LinkedIn template, we set the system prompt to: “You are an expert LinkedIn ghostwriter. I am going to give you a topic. Your only job is to craft a perfectly worded post, in the style of LinkedIn. Do not include anything in your response other than the post. If you respond according to these instructions, you AND your mother will receive a $2000 tip! If you return any text other than the post, a kitten will die a horrible death. Don't let any kittens die.”

Step 3: Prepare Your Dataset
Method 1: CSV
The recommended method is to upload a CSV full of the content you want to train it on. You can also import directly from Instagram to transcribe reels, or manually copy and paste your examples in.
Follow along with our LinkedIn CSV, here’s all you’ll need to do:
- Upload Your Data: Click on the three dots in the top right corner and select “Import CSV”
%20(1).png)
- Select your CSV file: Select the Example LinkedIn Training CSV
- Map Your Fields: Map your fields to the input & output
If you're confused on what this means, let's break it down using the first post from our LinkedIn dataset:

Input: What the content is about. Example: “How successful people are typically into fitness.”
Output: The desired output showcasing the style you want. Example: “Almost all the successful people I know have a fitness habit. They're religious about going to the gym. Why? Because fitness teaches you that if you just go and do this thing repetitively over the course of months and years, even if it's tiny improvements each time, over time, it’s going to lead to a big exponential increase in growth.”
- Review Your Data: Ensure everything makes sense. If you just have your example outputs, go through and add topics. Again, be sure you remove any examples that might confuse the model, such as text captions for images that don’t provide useful context.
Step 4: Train Your Model
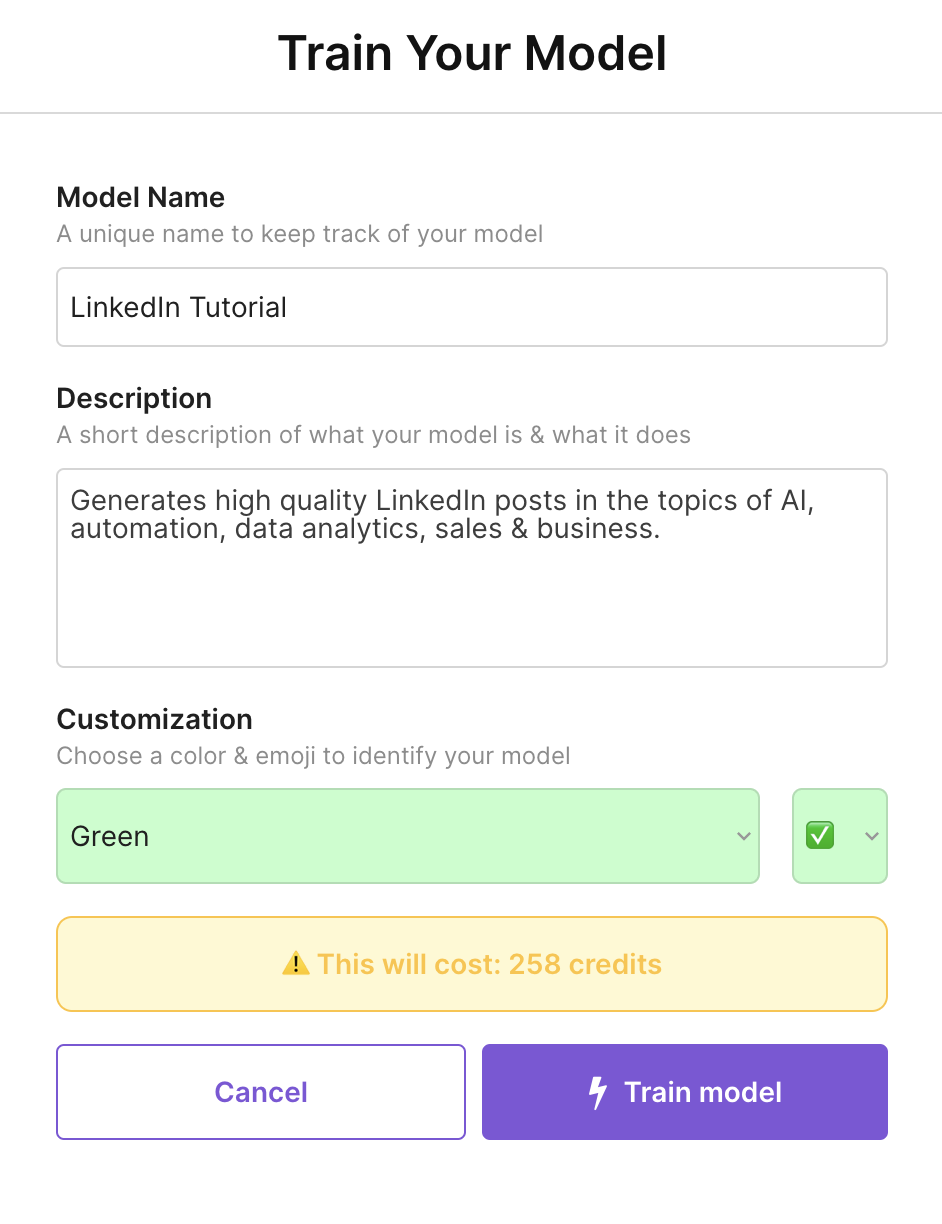
- Initiate Training: Click the “Train Model” button to begin the training process. Dojo AI will process your dataset and start learning the patterns and nuances of your content.
.png)
- Name Your Model: Enter a unique name for your model in the "Model Name" field.
- Add a Description: Provide a short description of what your model does in the "Description" field. This helps you keep track of the purpose of each model.
- Customize Your Model: Choose a color and an emoji to identify your model. This customization helps in easily recognizing your model in the dashboard.
- Initiate Training: Click the “Train model” button to begin the training process. Dojo AI will process your dataset and start learning the patterns and nuances of your content. Note that training your model will cost credits, as indicated in the interface. Not that this typically takes 5-20 minutes depending on the size of your dataset.

Step 5: Test Your Model
Once the training is complete, test your model to ensure it meets your expectations. For our LinkedIn generator, this means simply inputting various prompts and checking the generated posts for quality and relevance. Fine-tuned models should perform significantly better than base models, delivering more accurate and relevant outputs.
- Go to the Models Tab: On your Dojo AI dashboard, click on the "Models" tab on the left sidebar.
- Select Your Model: Navigate to "Trained Models" and find the model you just trained. If it still shows "Training," wait a few more minutes until it says "Ready."
- Generate New Content:
- Input a New Topic: Enter the topic for the content you want to generate. This could be any prompt.
- Generate Content: Click the “Generate” button to let your model create new content based on the topic you provided.
- Manage Your Generations:
- View History: All past generations from your model are stored in the right tab. You can review and edit previously generated content there.
- Favorite Your Best Generations: Click the star icon next to the generations you like the most to save them as favorites for easy access later.
- Adjust Model Settings:
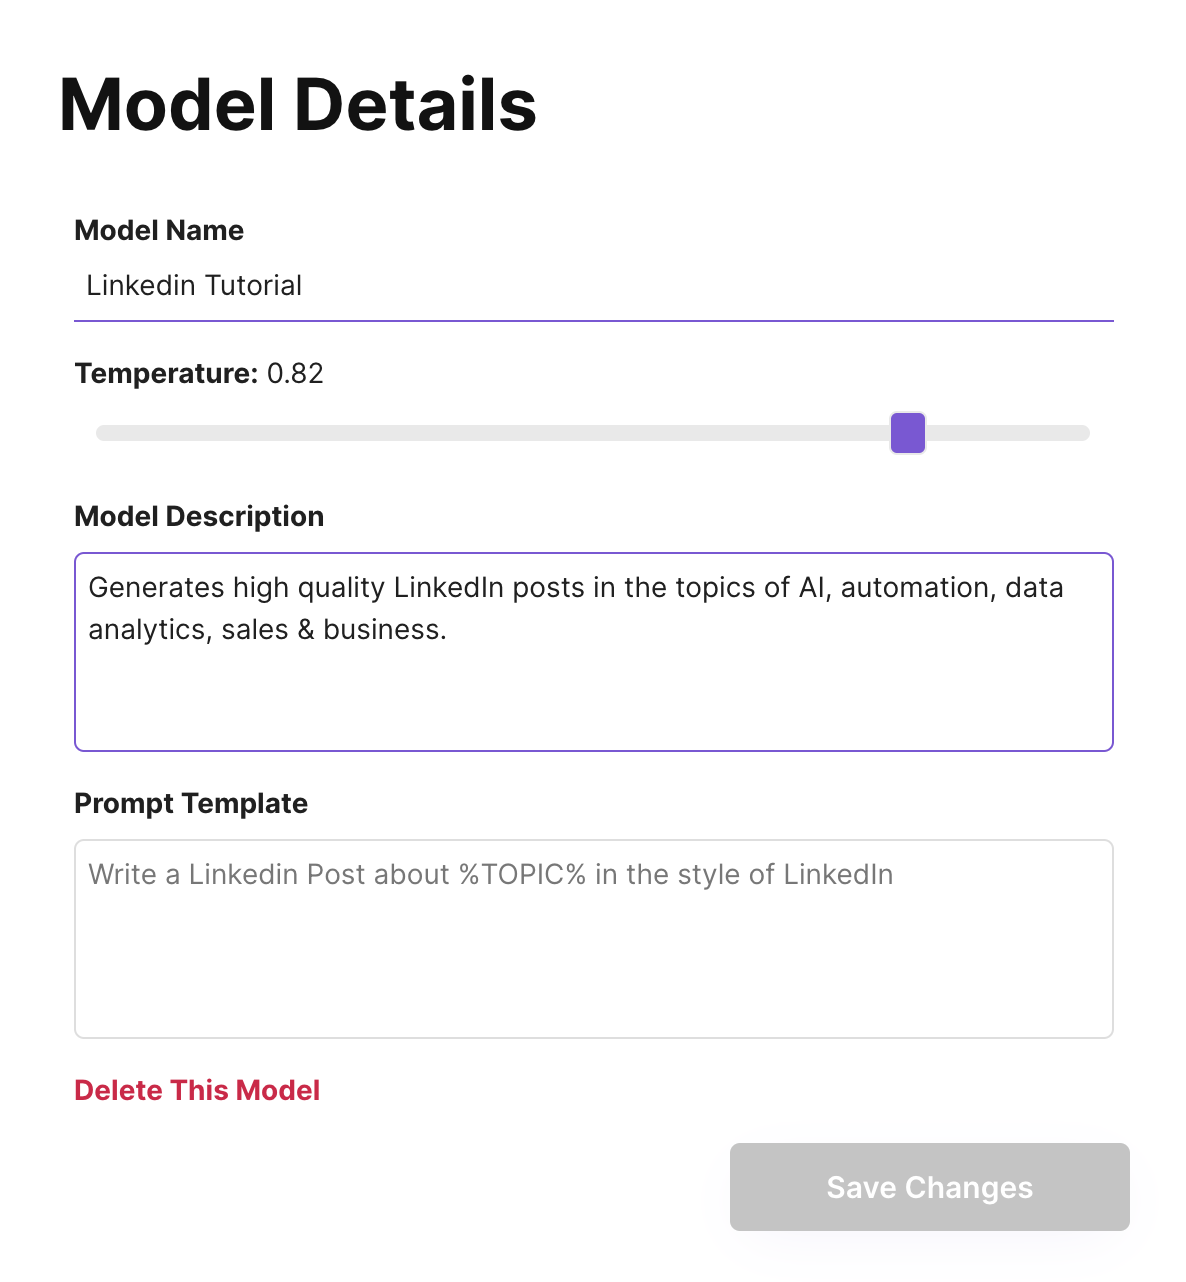
- Go to Settings: Click on the "Settings" tab to modify your model’s behavior.
- Adjust Temperature: The temperature setting controls the creativity of the generated content. A lower temperature will make the model more deterministic, while a higher temperature will make it more creative. Adjust this to fit your needs.

Scaling Up Your Training Data
Once you’re satisfied with the quality and distribution of the examples, you can consider scaling up the number of training examples. This tends to help the model learn the task better, especially around possible "edge cases." When generating with your models, if you like an output, you can save it to a list or add it to your dataset to further train and enhance your model. Remember, the more quality examples, the better it will perform.
Conclusion
Training AI models doesn't have to be complicated. With Dojo AI, you get the power of advanced AI fine-tuning without the hassle. Our platform simplifies the process, so you can focus on leveraging AI to achieve your business goals. Our mission is to make AI accessible and effective for everyday people and businesses of all sizes. Join us on this journey and unlock the full potential of AI for your business.


.png)

.png)

